*本文仅用于技术讨论与研究,这里使用的技术仅用于学习教育目的,如果列出的技术用于其他任何目标,本站及作者概不负责。
编写这个工具的用意是为了提高工作效率,扫描内网高危端口,定期进行资产梳理,整合内网有哪些web资产,然后将这些数据以execl表格的形式进行统计。该篇文章将详细介绍如何使用python编写工具,以及python常见模块的使用。
该篇章目的是熟悉python编程,学习python的一些常见模块,在编写程序的过程中会有很多操作和方式方法,希望大家能学到东西。
环境准备:
python3 -m pip install python-nmap,openpyxl,request 第一节 python-nmap模块的使用
1、nmap模块方法及参数介绍
#1、导入 nmap模块 import nmap #2、加载nmap模块 np=nmap.PortScanner() #3、使用nmap模块 hosts 参数 指定IP, arguments 参数 可指定多个参数 如 -sV -iL -p 等等 res=np.scan(hosts='127.0.0.1',arguments='-p 80,81,8080 -sV') #也可以不使用hosts参数 通过nmap 的-iL 参数批量读取文本的ip #res=np.scan(arguments='-p http* -iL ip.txt') print(type(res)) print(res) #------------返回的内容为字典格式----------------------- 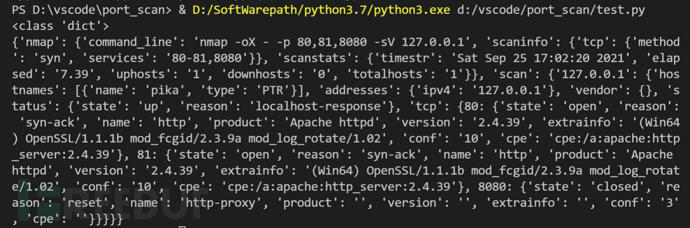
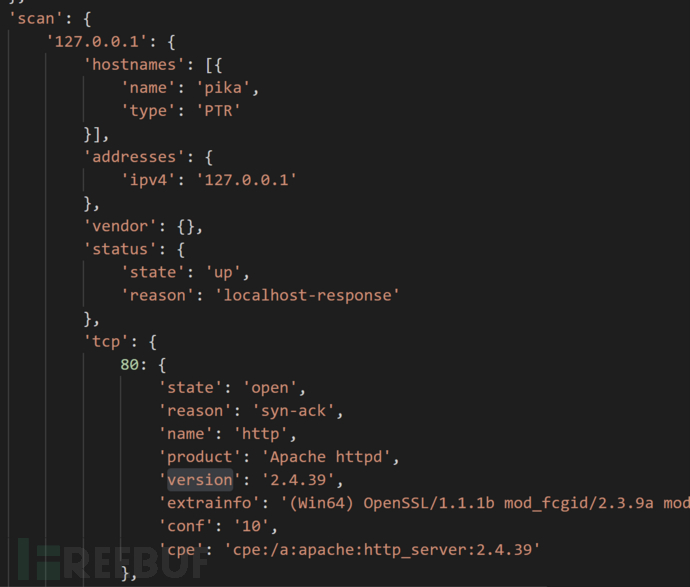
2、将打印的字典数据放到https://www.bejson.com/?src=xiaof 网站进行处理,可以直观的发现建值关系
3、遍历 字典数据,获取 ip、端口、状态、协议等信息 ,并将这些信息存储到字典中,方便后续调用,(注意这里np.scan没有使用hosts参数,直接使用nmap自带参数 -iL r.txt,需要创建一个 r.txt 文本文件 用来存储IP地址)
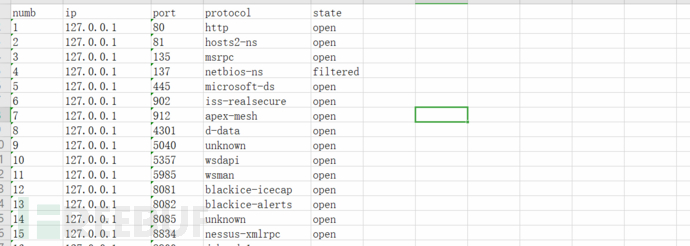
import nmap np=nmap.PortScanner() date={'numb':'','ip':'','port':'','protocol':'','state':''} res=np.scan(arguments='-p 21,22,80,8080,445 -iL r.txt') dir=res['scan'] for k in dir.keys(): #ip=(dir[k]['addresses']['ipv4']) for p in dir[k]['tcp']: numb+=1 date['numb']=numb date['ip']=str(dir[k]['addresses']['ipv4']) date['port']=str(p) date['state']=dir[k]['tcp'][p]['state'] date['protocol']=dir[k]['tcp'][p]['name'] print(date) 4、打印内容如下

第二节 openpyxl模块的使用
注:由于openpyxl 模块网上教程偏多,这里不详细介绍,可看注释一步一步调试,熟悉各个函数的功能
1、创建一个.xlsx文件并初始化内容
from openpyxl import * def init_excel(filename): #创建.xlsx表格,并初始化内容 wb=Workbook() filename=filename+".xlsx" ws=wb.create_sheet(index=0) #固定sheet为第一栏 head=['numb','ip','port','protocol','state'] for i in range(0,5): #ws.cell(1,n)表示第一行,第n列,与坐标相似,#第一列 的值 为 hand ws.cell(1,i+1).value=head[i] wb.save(filename) #保存文件,文件名为 port_Scan init_excel('port_Scan') 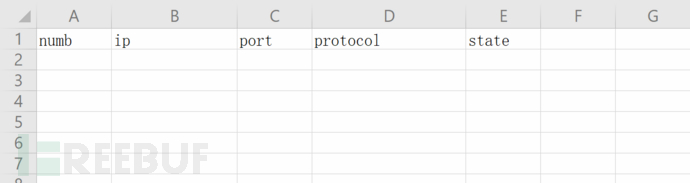
2、将上节处理好的数据 写入到 该表格中
def Save_Date(date,filename): #将数据存储到表格当中 filename=filename+".xlsx" wb_save=load_workbook(filename) #打开文件 ws_save=wb_save.worksheets[0] #固定sheet current_row=ws_save.max_row+1 #将坐标定位到第二行,(第一行是表头) current_col=1 for key in date: #将 第一节获取的date数据 进行遍历,写入到表格中 ws_save.cell(date['numb']+1,current_col).value=str(date[key]) current_col+=1 wb_save.save(filename) #保存文件 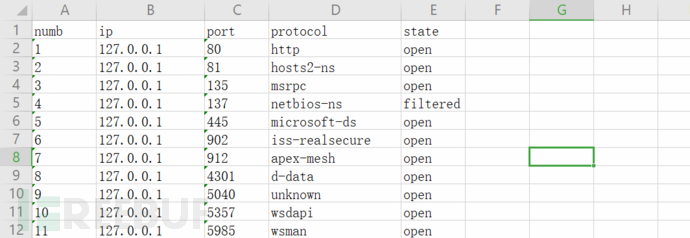
第三节 request模块的使用
功能:过滤 数据中 http、https服务,将ip与端口进行拼接,用request发起请求,记录title值,保存到excel文件中
1、处理json 数据,根据nmap 的数据规则 protocol:https 为https协议,其他 的http值均为http协议,可用此规则拼接url,放入request方法进行请求
for date in datas: if(date['protocol']=='https'): url="https://"+date['ip']+":"+date['port'] elif("http" in date['protocol']): url="http://"+date['ip']+":"+date['port'] if("http" in url): req(url) #掉用req函数 2、req 函数 也非常简单 就是传一个 url 参数 ,带入request方法 发起请求 ,当状态码为200的时候,将numb,url,title 保存到字典中,
注意:
我们知道https的站都是会有证书验证的,我们在使用Python3 requests发送HTTPS请求,已经关闭认证(verify=False)情况下,控制台会输出以下错误:
InsecureRequestWarning: Unverified HTTPS request is being made. Adding certificate verification is strongly advised. See: https://urllib3.readthedocs.io/en/latest/advanced-usage.html#ssl-warnings 这里我们加上**urllib3.disable_warnings()**这个是为了禁用requests发送HTTPS请求后的安全警告
def req(url): #对域名进行验证,返回状态码,title global numb_req heads = { #全局变量 请求头 'User-Agent':'Mozilla/5.0 (Windows NT 10.0; Win64; x64) AppleWebKit/537.36 (KHTML, like Gecko) Chrome/92.0.4515.107 Safari/537.36', #模拟浏览器请求 'Connection':'close', 'Accept-Encoding':'gzip, deflate' } data={'numb':'','url':'','title':''} try: #try: 是用来捕获异常的,当请求超时 或者网络不能访问时会抛出异常信息,程序照常运行,提高代码的稳定性 urllib3.disable_warnings() response = requests.get(url=url,headers=heads,verify=False,timeout=10) #请求漏洞的url if response.status_code == 200: bs=BeautifulSoup(response.content,"html.parser") title=bs.find("title").text numb_req+=1 data['numb']=numb_req data['url']=url data['title']=title print("[+]"+url+"ttitle:"+title) return data else: print('[-]请求失败:t{}t{}'.format(url,response.status_code)) except Exception as e: print('[-]请求失败: {}t'.format(e,url)) 第四节 多线程的使用
需要使用的库有:threading 、queue
多线程的学习可参考这篇文章:https://www.runoob.com/python3/python3-multithreading.html
这里使用 线程数可控的方式进行编写,首先 编写一个class ,run()方法 是线程启动后 默认调用的方法
class DoRun(threading.Thread): #自定义 多线程运行时使用的类 def __init__(self,queue): threading.Thread.__init__(self) self._queue=queue def run(self): while not self._queue.empty(): print("线程开始执行了") #req(self._queue.get()) #多线程要调用的方法 线程的启动和使用:
que=queue.Queue() threads=[thread_count] for date in datas: if(date['protocol']=='https'): url="https://"+date['ip']+":"+date['port'] elif("http" in date['protocol']): url="http://"+date['ip']+":"+date['port'] if("http" in url): req(url) que.put(url) #将url 加入到队列中, 在 DoRun 类 run()方法中使用self._queue.get()方法取出 for i in range(thread_count): threads.append(DoRun(que)) #使用多线程 默认调用 run()函数 for i in threads: i.start() #启动多线程 for i in threads: i.join() #等待线程结束 第五节 用户输入模块编写
1、这里使用的是optparse 这个模块,使用方法如下
from optparse import OptionParser #自定义输入参数 optParser = OptionParser() optParser.add_option('-t','--threads',type="int",help='线程数量,默认为50',default=50) #只列举了一个参数 (options , args) = optParser.parse_args() print(options.threads) #返回用户输入的线程数 ----------add_option()参数详解---------------------------------- -t: 简称,是指用户要输入的参数 --threads: 全称 type:参数的类型 help:使用 -h 显示的内容 default:默认值 参数介绍
-a --arguments 使用nmap模块时调用的参数 如 -p http* -iL r.txt 扫描r.txt文本的IP地址 获取http服务的数据 -T --Type 这里是要使用的模式,当Type =1 时,只扫描端口,当Type=2时,将扫描到的http服务进行下一步验证,获取title值 -t --thread_count 线程数量,当Type=2时 使用多线程 来请求http服务,获取title 默认 50 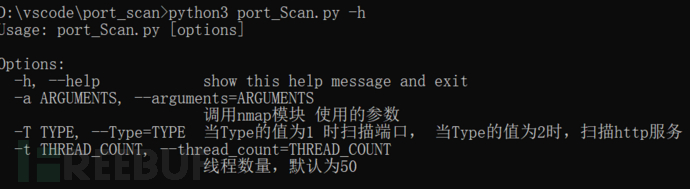

第六节 功能模块编写
该脚本主要是实现两个功能
1、扫描高危端口
2、梳理内网http资产
def run(): arguments,Type,thread_count=get_Input() #获取用户输入的参数 print("arguments={},Type={},thread_count={}".format(arguments,Type,thread_count)) np=nmap.PortScanner() res=np.scan(hosts='',arguments=arguments) #调用nmap模块 进行端口扫描 datas=get_datas(res) #将扫描到的数据进行整理,提取 filename=str(int(time.time())) #文件名为时间戳 if(Type==1): Save_Data(datas,filename) #当Type=1时,直接扫描端口 然后保存 elif(Type==2): get_title(datas,thread_count) #当Type=2时,先扫描http服务,然后使用request模块进行验证,获取title值,再保存 第七节 使用演示
扫描端口的使用方式 :python3 port_Scan.py -a "-p 0-65535 -iL r.txt" -T 1 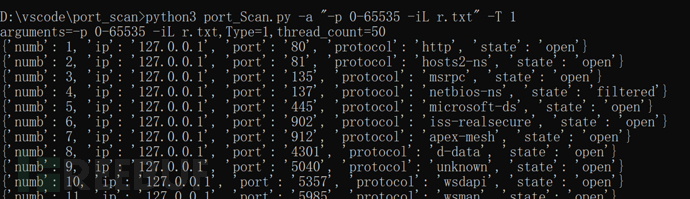
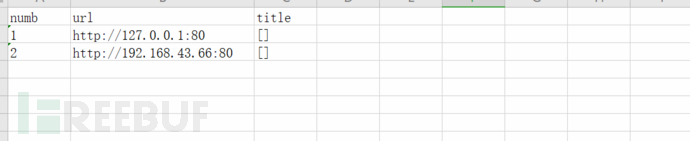
http资产梳理的使用方式:python3 port_Scan.py -a "-p http* -iL r.txt" -T 2 -t 50 这里只扫描http服务,效率更高,准确率比全端口扫描要低,由于自己搭建的web服务较为简陋,没有title值,所以这里为[] 
第八节 完整代码
import nmap from openpyxl import * #数据处理,将获取到的数据保存在excel文件中 import threading import queue import urllib3 import requests from optparse import OptionParser #自定义输入参数 import time import re numb_req=0 list=[] class DoRun(threading.Thread): #自定义 多线程运行时使用的类 def __init__(self,queue): threading.Thread.__init__(self) self._queue=queue def run(self): while not self._queue.empty(): date=req(self._queue.get()) #print(date) if(date): list.append(date) def init_excel(filename,sheetName): #创建.xlsx表格,并初始化内容 wb=Workbook() if(sheetName=="PortScan"): head=['numb','ip','port','protocol','state'] else: head=['numb','url','title'] ws=wb.create_sheet(sheetName,index=0) for i in range(0,len(head)): ws.cell(1,i+1).value=head[i] wb.save(filename) def Save_Data(datas,filename): #将数据存储到表格当中 filename=filename+".xlsx" init_excel(filename,"PortScan") wb_save=load_workbook(filename) ws_save=wb_save.worksheets[0] for data in datas: print(data) current_col=1 for key in data: ws_save.cell(data['numb']+1,current_col).value=str(data[key]) current_col+=1 wb_save.save(filename) def get_datas(res): #将 nmap 返回的数据 进行处理,返回 list[dir] dir=res['scan'] numb=0 datas=[] for k in dir.keys(): #ip=(dir[k]['addresses']['ipv4']) for p in dir[k]['tcp']: data={'numb':'','ip':'','port':'','protocol':'','state':''} numb+=1 data['numb']=numb data['ip']=str(dir[k]['addresses']['ipv4']) data['port']=str(p) data['state']=dir[k]['tcp'][p]['state'] data['protocol']=dir[k]['tcp'][p]['name'] #print("[+]data={}".format(data)) datas.append(data) return datas def get_title(datas,thread_count): #使用多线程 调用req ,获取datas(全局变量) que=queue.Queue() threads=[] for date in datas: url='' if(date['protocol']=='https'): url="https://"+date['ip']+":"+date['port'] elif("http" in date['protocol']): url="http://"+date['ip']+":"+date['port'] if(url!=''): que.put(url) for i in range(thread_count): threads.append(DoRun(que)) #使用多线程 默认调用 run()函数 for i in threads: i.start() #启动多线程 for i in threads: i.join() #等待线程结束 后将数据保存至文件 Save_title(list,str(int(time.time()))) def Save_title(datas,filename): #将获取的title 保存到execle 文件中 filename=filename+".xlsx" init_excel(filename,"title") wb_save=load_workbook(filename) ws_save=wb_save.worksheets[0] for data in datas: current_col=1 for key in data: ws_save.cell(data['numb']+1,current_col).value=str(data[key]) current_col+=1 wb_save.save(filename) def req(url): #对域名进行验证,返回状态码,title global numb_req heads = { #全局变量 请求头 'User-Agent':'Mozilla/5.0 (Windows NT 10.0; Win64; x64) AppleWebKit/537.36 (KHTML, like Gecko) Chrome/92.0.4515.107 Safari/537.36', #模拟浏览器请求 'Connection':'close', 'Accept-Encoding':'gzip, deflate' } data={'numb':'','url':'','title':''} try: urllib3.disable_warnings() resp = requests.get(url=url,headers=heads,verify=False,timeout=10) #请求漏洞的url if resp.status_code == 200: title=re.findall("<title>(.*?)</title>",resp.text) numb_req+=1 data['numb']=numb_req data['url']=url data['title']=title #print("[+]"+url+"ttitle:"+title) print("[+]请求成功{}".format(data)) return data else: print('[-]请求失败') except Exception as e: print('[-]请求失败e:') def get_Input(): #获取用户输入的参数 ,返回 argument, optParser = OptionParser() optParser.add_option('-a','--arguments',action = 'store',type = "string",help='调用nmap模块 使用的参数',default="-iL r.txt") optParser.add_option("-T","--Type", action="store", type="int",help='当Type的值为1 时扫描端口, 当Type的值为2时,扫描http服务',default=1) optParser.add_option("-t","--thread_count", action="store", type="int",help='线程数量,默认为50',default=50) (options , args) = optParser.parse_args() return options.arguments,options.Type,options.thread_count def print_info(datas): for data in datas: print("[+]"+str(data['ip'])+" "+str(data['port']+" "+str(data['protocol'])+" is "+str(data['state']))) def run(): arguments,Type,thread_count=get_Input() #获取用户输入的参数 print("arguments={},Type={},thread_count={}".format(arguments,Type,thread_count)) np=nmap.PortScanner() res=np.scan(hosts='',arguments=arguments) #调用nmap模块 进行端口扫描 datas=get_datas(res) #将扫描到的数据进行整理,提取 filename=str(int(time.time())) #文件名为时间戳 if(Type==1): Save_Data(datas,filename) #当Type=1时,直接扫描端口 然后保存 elif(Type==2): get_title(datas,thread_count) #当Type=2时,先扫描http服务,然后使用request模块进行验证,获取title值,再保存 run() 本文作者:, 属于FreeBuf原创奖励计划,未经许可禁止转载