背景
随着企业安全建设的不断完善,信息安全的工作也进入了Happy(苦逼)的运营阶段。谈起安全运营工作,自然避不开事件响应这个话题。对于安全事件响应而言,我们时常会需要进行跨部门的协作。并且在某些事件中,我们甚至需要进行持续的跟踪与排查。因此,在事件的响应过程中,对于每一个响应步骤的记录显得尤为重要。它可以帮助我们在事件解决后,将经验教训纳入其中,加强整体安全能力。另一方面从自动化的角度来说,我们也应该考虑如何将响应过程转换为可被复用的Playbook,用以快速应对攻击,从而缩短感染攻击到遏制攻击的时间。下面来说说我这的痛点,或者也可以说是我们在运营过程中所需要解决的一些问题:
如何在事件响应过程中记录每一个响应步骤所花费的时间?这些任务的处理时间,将会直接影响到我们后期MTTD与MTTR的计算。
如何从安全事件中提炼Playbook?对于重复可被流程化的过程,自动化才是王道啊。
面对各种“骚”操作的攻击手法,如何提供更多可定制化的插件给安全分析人员使用,用以提升安全分析的效率?
如何快速的与现有的安全设备进行联动,并及时止损。
通常安全事件会涉及跨部门协作的情况,我们如何快速就此次事件展开分析并及时与协作部门之间同步事件进展。
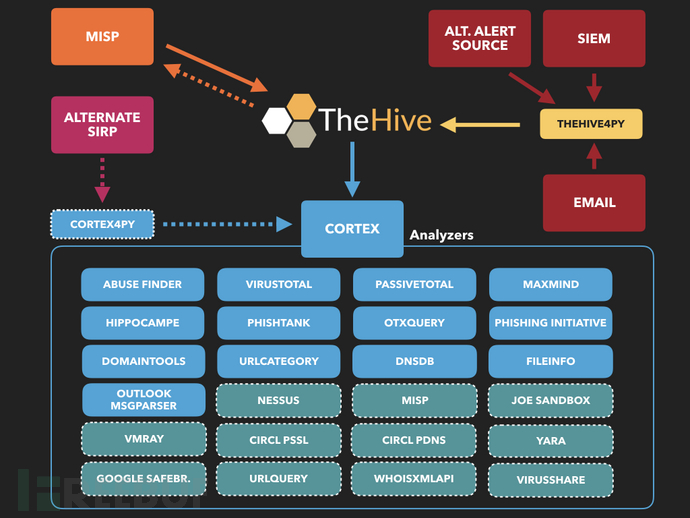
安全事件响应平台 – TheHive
我最终选择了TheHive安全事件响应平台来协助我进行日常的安全运营工作。TheHive不同于SIEM*这类的产品,它主要对接的是需要被真实响应的安全事件。例如:需要人工研判的事件或者危急的安全告警。以下简单总结了一下,TheHive的特性:
融合协作:TheHive将安全事件视作Case,提倡多人、跨部门之间的协作。通过分享机制,可以快速与协作部门之间同步安全事件进展。
成本度量:TheHive支持记录每个Case、Task的时间成本开销。可以帮助我们更好的去度量现有的MTTD、MTTR指标,也为我们后期去优化指标提供了重要的依据。
快速响应:在事件响应的过程中,你会需要对已有的数据进行分析,并迅速提供补救措施来阻止攻击。TheHive的Cortex组件支持对数据进行快速的分析,并将已确认的IoC自动化推送到现有的安全设备完成与SIEM、WAF、FW、EDR的联动。
效率提升:对于可被流程化的响应过程,必然是需要自动化的,也就少不了日常Playbook的积累。那么,Playbook从何而来?我们可以采用TheHive去记录每一次的安全事件响应的过程,并通过Task的形式去拆分需要协作的事项以及响应的步骤,利用这种方式帮助我们去积累Playbook。
TheHive集群部署
由于篇幅的关系,这里主要介绍的是采用TheHive集群时需要调整的一些配置。至于如何安装TheHive,请参考:Step-by-Step guide。如果只是为了测试的话,可以直接用官网提供的Docker或者VM镜像。
以下将会分别说明当采用TheHive集群时,TheHive、Cortex、Cassandra、Minio需要做的调整。
Thehive
我们将节点1视为主节点,通过编辑/etc/thehive/application.conf文件来配置akka组件,如下所示:
## Akka server akka { cluster.enable = on actor { provider = cluster } remote.artery { canonical { hostname = "<My IP address>" port = 2551 } } # seed node list contains at least one active node cluster.seed-nodes = [ "akka://application@<Node 1 IP address>:2551", "akka://application@<Node 2 IP address>:2551", "akka://application@<Node 3 IP address>:2551" ] } 数据库 – Cassandra
集群配置
使用以下参数更新配置文件:/etc/cassandra/cassandra.yaml
cluster_name: 'thp' num_tokens: 256 authenticator: PasswordAuthenticator authorizer: CassandraAuthorizer role_manager: CassandraRoleManager data_file_directories: - /var/lib/cassandra/data commitlog_directory: /var/lib/cassandra/commitlog saved_caches_directory: /var/lib/cassandra/saved_caches seed_provider: - class_name: org.apache.cassandra.locator.SimpleSeedProvider parameters: - seeds: "<ip node 1>, <ip node 2>, <ip node 3>" listen_interface : ens160 # 监听的接口 rpc_interface: ens160 # 监听的接口 endpoint_snitch: SimpleSnitch 删除文件/etc/cassandra/cassandra-topology.properties
启动服务
启动服务
$ service cassandra start 查询集群状态
$ nodetool status Datacenter: datacenter1 ======================= Status=Up/Down |/ State=Normal/Leaving/Joining/Moving -- Address Load Tokens Owns (effective) Host ID Rack UN 192.168.199.35 449.33 KiB 256 100.0% 72e95db1-9c37-4a53-9312-76bd0b2e6ca7 rack1 UN 192.168.199.36 631.65 KiB 256 100.0% 4051f9d4-91de-43e5-9a4a-c3da46417830 rack1 UN 192.168.199.37 437.13 KiB 256 100.0% 8844626f-04c0-4dd3-855e-088935b8dc65 rack1 初始化数据库
修改数据库默认密码(默认账户密码:cassandra/cassandra)
$ cqlsh th01 -u cassandra cassandra@cqlsh> ALTER USER cassandra WITH PASSWORD 'HelloWorld'; cassandra@cqlsh> quit; 确保所有节点上的用户账户都是一致的
$ cqlsh <ip node X> -u cassandra cassandra@cqlsh> ALTER KEYSPACE system_auth WITH replication = {'class': 'SimpleStrategy', 'replication_factor': 3 }; 创建名为thehive的KEYSPACE
cassandra@cqlsh> CREATE KEYSPACE thehive WITH replication = {'class': 'SimpleStrategy', 'replication_factor': '3' } AND durable_writes = 'true'; 创建角色thehive,并授予thehive权限(选择密码)
cassandra@cqlsh> CREATE ROLE thehive WITH LOGIN = true AND PASSWORD = 'HelloWorld'; cassandra@cqlsh> GRANT ALL PERMISSIONS ON KEYSPACE thehive TO 'thehive'; TheHive相关配置
由于最新的TheHive集群需要配合ElasticSearch进行索引,因此需要同步更新如下配置:/etc/thehive/application.conf
db.janusgraph { storage { ## Cassandra configuration backend: cql hostname: ["<ip node 1>", "<ip node 2>", "<ip node 3>"] username: "cassandra" password: "HelloWorld" cql { cluster-name: thp keyspace: thehive } } ## Index configuration index.search { backend: elasticsearch hostname: ["<es node 1>", "es node 2", "es node 3"] index-name: thehive # auth elasticsearch.http.auth.type=basic elasticsearch.http.auth.basic.username=elastic elasticsearch.http.auth.basic.password=HelloWorld # ssl elasticsearch.ssl.enabled=true elasticsearch.ssl.truststore.location=/etc/thehive/truststore.jks elasticsearch.ssl.truststore.password=HelloWorld } } 文件存储 – Minio
由于我的文件存储是采用了Minio,所以这里需要配置一下。其实更简单的方式,你可以考虑使用S3。
创建目录与用户
$ mkdir /opt/minio $ adduser minio 创建数据卷
在每台服务器上至少创建2个数据卷
$ mkdir -p /srv/minio/{1,2} $ chown -R minio:minio /srv/minio 修改主机名
$ vim /etc/hosts 192.168.199.35 minio1 192.168.199.36 minio2 192.168.199.37 minio3 安装
$ cd /opt/minio $ mkdir /opt/minio/{bin,etc} $ wget -O /opt/minio/bin/minio https://dl.minio.io/server/minio/release/linux-amd64/minio $ chown -R minio:minio /opt/minio 配置
新建配置文件/opt/minio/etc/minio.conf
MINIO_OPTS="server --address :9100 http://minio{1...3}/srv/minio/{1...2}" MINIO_ACCESS_KEY="admin" MINIO_SECRET_KEY="HelloWorld" 新建系统启动文件/usr/lib/systemd/system/minio.service
[Unit] Description=minio Documentation=https://docs.min.io Wants=network-online.target After=network-online.target AssertFileIsExecutable=/opt/minio/bin/minio [Service] WorkingDirectory=/opt/minio User=minio Group=minio EnvironmentFile=/opt/minio/etc/minio.conf ExecStart=/opt/minio/bin/minio $MINIO_OPTS Restart=always LimitNOFILE=65536 TimeoutStopSec=0 SendSIGKILL=no [Install] WantedBy=multi-user.target 启动
$ systemctl daemon-reload $ systemctl enable minio $ systemctl start minio.service 注:这里记得确认一下权限的问题,权限不对的话会导致进程起不来。
登录Minio创建bucket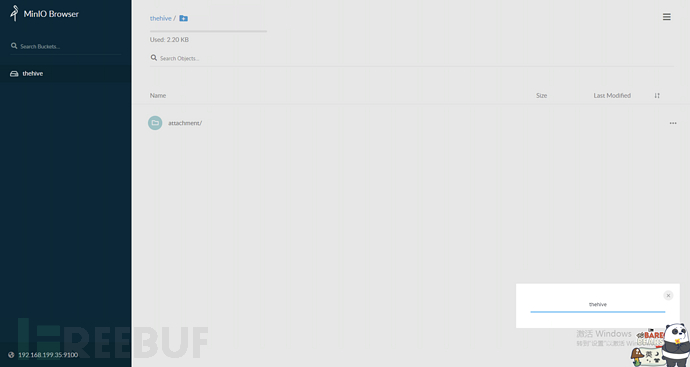
修改TheHive配置文件/etc/thehive/application.conf
## Attachment storage configuration storage { provider: s3 s3 { bucket = "thehive" readTimeout = 1 minute writeTimeout = 1 minute chunkSize = 1 MB endpoint = "http://minio1:9100" accessKey = "admin" secretKey = "HelloWorld" region = "us-east-1" } } alpakka.s3.path-style-access = force 分析组件 – Cortex
修改 Cortex配置文件/etc/cortex/application.conf
这里注意,官方默认的配置文件有个小问题。当采用Elastic认证的时候需要将username修改为user,否则会报错。
play.http.secret.key="QZUm2UgZYXF6axC" search { index = cortex uri = "https://elasticsearch01:9200,elasticsearch02:9200,elasticsearch03:9200" user = "elastic" # 修改username为user password = "HelloWorld" keyStore { path = "/etc/cortex/truststore.jks" password = "HelloWorld" } trustStore { path = "/etc/cortex/truststore.jks" password = "HelloWorld" } } Analyzers and Responders
由于在Cortex3中实现了对dockerized分析器的支持,安装过程已经被大大简化。因此,我们不必纠结于安装插件时的Python或其他库依赖项这种头疼的问题。
a. 安装Docker
## Ubuntu 18.04 $ wget -O- https://download.docker.com/linux/ubuntu/gpg | sudo apt-key add - $ add-apt-repository "deb [arch=amd64] https://download.docker.com/linux/ubuntu bionic stable" $ sudo apt-get update $ sudo apt-get install docker-ce b. 给Cortex账户运行Docker的权限
$ usermod -a -G docker cortex c. 更新配置文件/etc/cortex/application.conf,启用analyzers.json
## ANALYZERS # analyzer { urls = [ "https://download.thehive-project.org/analyzers.json" # 本次新增 "/etc/cortex/Cortex-Analyzers/analyzers" ] } ## RESPONDERS # responder { urls = [ "https://download.thehive-project.org/responders.json" # 本次新增 "/etc/cortex/Cortex-Analyzers/responders" ] } 如何创建插件
前面有说到Cortex组件默认已经集成了丰富的Analyzers与Responses插件,便于分析师去快速的对安全事件进行分析。在实际使用过程中根据需求场景的不同,我们仍需要进行一些插件的定制化。如何创建插件,官网有很详细的文档介绍,请参考:How to Write and Submit an Analyzer。以下附上了部分新增的插件代码:
好了,废话少说,放“码”过来!!!
Analyzers – 插件
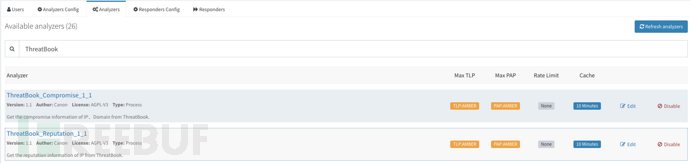
我们把商业威胁情报和TheHive进行了整合。
threatbook.py
#!/usr/bin/env python3 # encoding: utf-8 import requests class ThreatBookError(Exception): def __init__(self, message): Exception.__init__(self, message) self.message = message class ThreatBook(): """ Threat intelligence: Threat Book https://x.threatbook.cn/nodev4/vb4/API """ def __init__(self, key): self.key = key self.ua = "HappyHunting" self.session = requests.Session() self.urls = { 'compromise': 'https://api.threatbook.cn/v3/scene/dns', 'reputation': 'https://api.threatbook.cn/v3/scene/ip_reputation' } def _request(self, url, params={}): """ Request an url """ headers = {'User-Agent': self.ua} r = self.session.get( url=url, params=params, headers=headers ) ''' { "response_code": -1, "verbose_msg": "Invalid Access IP" } ''' if r.status_code != 200: raise ThreatBookError( 'Invalid HTTP status code %i' % r.status_code) if r.json()['response_code'] != 0: raise ThreatBookError(r.json()) return r.json() def parser_results(self, results): for k, v in results.items(): intel = { 'ioc': k, 'malicious': v['is_malicious'], 'confidence': v['confidence_level'], 'tags': v['judgments'] } return intel def get_reputation(self, ioc): """Getting reputation IP""" url = self.urls['reputation'] params = { 'apikey': self.key, 'resource': ioc } results = self._request(url=url, params=params) return self.parser_results(results['data']) def get_compromise(self, ioc): """Getting compromise IoC""" url = self.urls['compromise'] params = { 'apikey': self.key, 'resource': ioc } results = self._request(url=url, params=params) return self.parser_results(list(results['data'].values())[0]) if __name__ == '__main__': key = '<api_key>' threat = ThreatBook(key) # reputation ioc = '8.8.8.8' r = threat.get_reputation(ioc) # compromise ioc = 'zzv.no-ip.info' r = threat.get_compromise(ioc) print(r) threatbook_analyzer.py
#!/usr/bin/env python3 # encoding: utf-8 from threatbook import ThreatBook from cortexutils.analyzer import Analyzer class ThreatBookAnalyzer(Analyzer): def __init__(self): Analyzer.__init__(self) self.service = self.get_param( 'config.service', None, 'Service parameter is missing') self.key = self.get_param( 'config.key', None, 'Missing ThreatBook API key') self.polling_interval = self.get_param('config.polling_interval', 1) self.threatbook = ThreatBook(self.key) def summary(self, raw): taxonomies = [] level = "info" namespace = "ThreatBook" value = "False" if self.service == 'reputation': predicate = 'Reputation' elif self.service == 'compromise': predicate = 'Compromise' if raw: if raw['malicious'] == True: level = "malicious" value = "True" taxonomies.append(self.build_taxonomy( level, namespace, predicate, value)) return {"taxonomies": taxonomies} def run(self): if self.service == 'reputation': data = self.get_param('data', None, 'Data is missing') results = self.threatbook.get_reputation(data) self.report(results) elif self.service == 'compromise': data = self.get_param('data', None, 'Data is missing') results = self.threatbook.get_compromise(data) self.report(results) else: self.error('Invalid data type') if __name__ == '__main__': ThreatBookAnalyzer().run() ThreatBook_Compromise.json
{ "name": "ThreatBook_Compromise", "version": "1.0", "author": "Canon", "url": "https://github.com/TheHive-Project/Cortex-Analyzers", "license": "AGPL-V3", "description": "Get the compromise information of IP、Domain from ThreatBook.", "dataTypeList": [ "ip", "domain" ], "command": "ThreatBook/threatbook_analyzer.py", "baseConfig": "ThreatBook", "config": { "service": "compromise" }, "configurationItems": [ { "name": "key", "description": "API key for ThreatBook", "type": "string", "multi": false, "required": true }, { "name": "polling_interval", "description": "Define time interval between two requests attempts for the report", "type": "number", "multi": false, "required": false, "defaultValue": 60 } ] } ThreatBook_Reputation.json
{ "name": "ThreatBook_Reputation", "version": "1.0", "author": "Canon", "url": "https://github.com/TheHive-Project/Cortex-Analyzers", "license": "AGPL-V3", "description": "Get the reputation information of IP from ThreatBook.", "dataTypeList": [ "ip" ], "command": "ThreatBook/threatbook_analyzer.py", "baseConfig": "ThreatBook", "config": { "service": "reputation" }, "configurationItems": [ { "name": "key", "description": "API key for ThreatBook", "type": "string", "multi": false, "required": true }, { "name": "polling_interval", "description": "Define time interval between two requests attempts for the report", "type": "number", "multi": false, "required": false, "defaultValue": 60 } ] } 对于一些访问登录接口异常的IP,也可以查询一下是否为Proxy。
proxycheck.py
#!/usr/bin/env python3 # encoding: utf-8 import requests class ProxyCheckError(Exception): def __init__(self, message): Exception.__init__(self, message) self.message = message class ProxyCheck(): """ Threat intelligence: ProxyCheck http://proxycheck.io/v2/ """ def __init__(self, key): self.key = key self.ua = "HappyHunting" self.session = requests.Session() self.url = 'http://proxycheck.io/v2/' self.params = { 'v_p_n': 1, 'asn': 1, 'time': 1, 'info': 0, 'risk': 1, 'port': 1, 'seen': 1, 'days': 7, 'tag': 'siem' } def _request(self, url, params={}): """ Request ProxyCheck API """ headers = {'User-Agent': self.ua} r = self.session.get( url=url, params=params, headers=headers ) if r.status_code != 200: raise ProxyCheckError( 'Invalid HTTP status code %i' % r.status_code) return r.json() def check_proxy(self, data): """ Checking proxy information from proxycheck.io """ url = self.url + data self.params['key'] = self.key results = self._request(url=url, params=self.params) return self.parser_results(results, data) def parser_results(self, r, ioc): """ Parsing results """ intel = {} if r['status'] == 'ok': intel = { 'ip': ioc, 'country': r[ioc]['country'], 'city': r[ioc]['proxy'], 'proxy': r[ioc]['proxy'], 'type': r[ioc]['type'], 'provider': r[ioc]['provider'] } return intel if __name__ == '__main__': key = '<api_key>' proxycheck = ProxyCheck(key) ioc = '8.8.8.8' r = proxycheck.check_proxy(ioc) print(r) proxycheck_analyzer.py
#!/usr/bin/env python3 # encoding: utf-8 from proxycheck import ProxyCheck from cortexutils.analyzer import Analyzer class ProxyCheckAnalyzer(Analyzer): def __init__(self): Analyzer.__init__(self) self.service = self.get_param( 'config.service', None, 'Service parameter is missing') self.key = self.get_param( 'config.key', None, 'Missing ProxyCheck API key') self.polling_interval = self.get_param('config.polling_interval', 1) self.proxycheck = ProxyCheck(self.key) def summary(self, raw): taxonomies = [] level = "info" namespace = "ProxyCheck" predicate = "Proxy" value = "False" if raw.get("proxy") == "yes": level = "suspicious" value = "True" taxonomies.append(self.build_taxonomy( level, namespace, predicate, value)) return {"taxonomies": taxonomies} def run(self): if self.service == 'proxycheck': data = self.get_param('data', None, 'Data is missing') results = self.proxycheck.check_proxy(data) self.report(results) else: self.error('Invalid data type') if __name__ == '__main__': ProxyCheckAnalyzer().run() ProxyCheck.json
{ "name": "ProxyCheck", "version": "1.0", "author": "Canon", "url": "https://github.com/TheHive-Project/Cortex-Analyzers", "license": "AGPL-V3", "description": "Get the compromise information of IP from ProxyCheck.", "dataTypeList": ["ip"], "command": "ProxyCheck/proxycheck_analyzer.py", "baseConfig": "ProxyCheck", "config": { "service": "proxycheck" }, "configurationItems": [ { "name": "key", "description": "API key for ProxyCheck", "type": "string", "multi": false, "required": true }, { "name": "polling_interval", "description": "Define time interval between two requests attempts for the report", "type": "number", "multi": false, "required": false, "defaultValue": 60 } ] } Responders- 插件
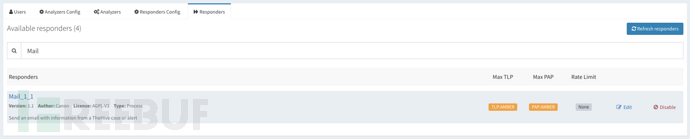
Cortex默认有一个插件(Mailer)负责发送邮件。使用了一下发现比较“坑”,首先不支持对多个收件人的发送,且当选择从Observables中发送邮件时,收件人竟然是mail类型的IoC。。。 WTF!别问我怎么知道的,它源码里就是这么写的。。。所以,自己动手丰衣足食!
主要功能:
插件在原有的基础上新增了批量发送的功能;
新增了支持对task logs数据类型的发送;
发送邮件时会附带当前case或者task的links,便于收件人快速浏览问题;
mail.py
#!/usr/bin/env python3 # encoding: utf-8 import ssl import smtplib import mistune from cortexutils.responder import Responder from email.mime.multipart import MIMEMultipart from email.mime.text import MIMEText class Mail(Responder): def __init__(self): Responder.__init__(self) self.smtp_host = self.get_param("config.smtp_host", "localhost") self.smtp_port = self.get_param("config.smtp_port", "25") self.mail_from = self.get_param( "config.from", None, "Missing sender email address" ) self.smtp_user = self.get_param("config.smtp_user", "user", None) self.smtp_pwd = self.get_param("config.smtp_pwd", "pwd", None) self.thehive_url = self.get_param("config.thehive_url", None, None) def create_links(self): """ Create TheHive links :rtype: String :return: URL """ if self.data_type == "thehive:case": case_id = self.get_param( "data.id", None, "case id is missing" ) url = self.thehive_url + "/index.html#!/case/{}/details".format(case_id) elif self.data_type == "thehive:case_task": case_id = self.get_param( "data.case.id", None, "case id is missing" ) task_id = self.get_param( "data.id", None, "task id is missing" ) url = self.thehive_url + "/index.html#!/case/{}/tasks/{}".format(case_id, task_id) elif self.data_type == "thehive:case_task_log": case_id = self.get_param( "data.case_task.case.id", None, "case id is missing" ) task_id = self.get_param( "data.case_task.id", None, "task id is missing" ) url = self.thehive_url + "/index.html#!/case/{}/tasks/{}".format(case_id, task_id) return url def run(self): Responder.run(self) if self.data_type == "thehive:case_task_log": title = self.get_param( "data.case_task.title", None, "title is missing") else: title = self.get_param("data.title", None, "title is missing") if self.data_type in ["thehive:case", "thehive:case_task"]: description = self.get_param( "data.description", None, "case description is missing" ) elif self.data_type == "thehive:case_task_log": description = self.get_param( "data.message", None, "task logs description is missing" ) elif self.data_type == "thehive:alert": description = self.get_param( "data.case.description", None, "alert description is missing" ) else: self.error("Invalid dataType") mail_to = [] if self.data_type == "thehive:case": # Search recipient address in case tags tags = self.get_param( "data.tags", None, "recipient address not found in tags" ) mail_tags = [t[5:] for t in tags if t.startswith("mail:")] if mail_tags: mail_to = mail_tags else: self.error("recipient address not found in tags") elif self.data_type in ["thehive:case_task", "thehive:case_task_log"]: # Search recipient address in tasks description descr_array = description.splitlines() if "mailto:" in descr_array[0]: mail_str = descr_array[0].replace("mailto:", "").strip() mail_to = [i.strip() for i in mail_str.split(',')] else: self.error("recipient address not found in description") # Set rest of description as body description = "n".join(descr_array[1:]) elif self.data_type == "thehive:alert": # Search recipient address in artifacts artifacts = self.get_param( "data.artifacts", None, "recipient address not found in observables" ) mail_artifacts = [ a["data"] for a in artifacts if a.get("dataType") == "mail" and "data" in a ] mail_tags = [ t[5:] for t in mail_artifacts if t.startswith("mail:") ] if mail_tags: mail_to = mail_tags else: self.error("recipient address not found in observables") msg = MIMEMultipart() msg["Subject"] = title msg["From"] = self.mail_from msg["To"] = ','.join(mail_to) # Markdown to HTML content = mistune.markdown(description, escape=True, hard_wrap=True) # add TheHive Links links = self.create_links() content += 'n<p><a href="{}">Click me to TheHive</a></p>n'.format(links) msg.attach(MIMEText(content, "html", "utf-8")) if self.smtp_user and self.smtp_pwd: try: context = ssl.create_default_context() with smtplib.SMTP(self.smtp_host, self.smtp_port) as server: server.ehlo() server.starttls(context=context) server.ehlo() server.login(self.smtp_user, self.smtp_pwd) server.send_message(msg, self.mail_from, mail_to) except smtplib.SMTPNotSupportedError: with smtplib.SMTP(self.smtp_host, self.smtp_port) as server: server.ehlo() server.login(self.smtp_user, self.smtp_pwd) server.send_message(msg, self.mail_from, mail_to) else: with smtplib.SMTP(self.smtp_host, self.smtp_port) as server: server.send_message(msg, self.mail_from, mail_to) self.report({"message": "message sent"}) def operations(self, raw): return [self.build_operation("AddTagToCase", tag="mail sent")] if __name__ == "__main__": Mail().run() Mail.json
{ "name": "Mail", "version": "1.0", "author": "Canon", "url": "https://github.com/TheHive-Project/Cortex-Analyzers", "license": "AGPL-V3", "description": "Send an email with information from a TheHive case or alert", "dataTypeList": ["thehive:case", "thehive:alert", "thehive:case_task", "thehive:case_task_log"], "command": "Mail/mail.py", "baseConfig": "Mail", "configurationItems": [ { "name": "from", "description": "email address from which the mail is send", "type": "string", "multi": false, "required": true }, { "name": "smtp_host", "description": "SMTP server used to send mail", "type": "string", "multi": false, "required": true, "defaultValue": "localhost" }, { "name": "smtp_port", "description": "SMTP server port", "type": "number", "multi": false, "required": true, "defaultValue": 25 }, { "name": "smtp_user", "description": "SMTP server user", "type": "string", "multi": false, "required": false, "defaultValue": "user" }, { "name": "smtp_pwd", "description": "SMTP server password", "type": "string", "multi": false, "required": false, "defaultValue": "pwd" }, { "name": "thehive_url", "description": "TheHive server address", "type": "string", "multi": false, "required": true, "defaultValue": "http://localhost:9000" } ] } Threat Intelligence
默认TheHive是推荐与MISP进行对接并实现情报的feed。由于我们自建了本地威胁情报,所以写了一个Responders插件,帮助在分析时提交IoC并推送给SIEM,当分析师确认IoC时,可以通过选择Observables的Responders插件自动提交IoC至本地威胁情报库。以下为提交IoC的示例:
{ "threat": { "ioc": "193.142.146.143", "type": "ip", "tags": [ "burp scan" ], "description": "该IP在短时间内对用户登录接口发起大量访问,且包含着大量登录失败的情况", "created_by": "canon@loveyou.com", "producer": "Canon", "provider": "TheHive", "creation_time": "2021-05-14T09:48:23.664Z", "modification_time": "2021-05-14T09:48:23.664Z", "expiration_time": "2021-05-29T09:48:23.664Z", "meta": { "case": [ { "title": "安全分析 - 周报(05.10-05.14)", "created_by": "canon@loveyou.com", "owner": "canon@loveyou.com", "link": "https://127.0.0.1:9000/index.html#!/case/~43769904/observables/~463080" } ] } }, "timestamp": "2021-05-14T09:48:23.664Z" } 如何启用插件
加载插件
修改配置文件/etc/cortex/application.conf
建议大家将新增的插件与官方的插件区别开,这样后期也便于维护。
## ANALYZERS # analyzer { urls = [ "https://download.thehive-project.org/analyzers.json" "/etc/cortex/Cortex-Analyzers/analyzers" # 新增自定义插件 ] } # RESPONDERS # responder { urls = [ "https://download.thehive-project.org/responders.json" "/etc/cortex/Cortex-Analyzers/responders" # 新增自定义插件 ] } 启用插件
Analyzers
Responder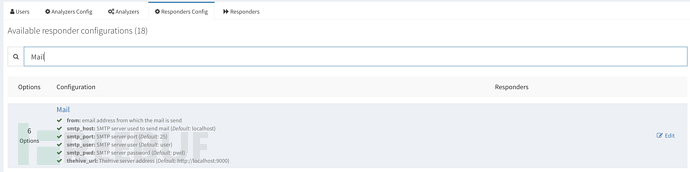
使用场景
下面来说一下我们都用TheHive做了哪些,刚开始使用场景并不多,还需要后期的慢慢摸索。
提前创建好模板,例如:按照Playbook的形式提前创建好。便于后期快速引用
分析周报模板
按照周为单位创建Case,以天为单位创建Task。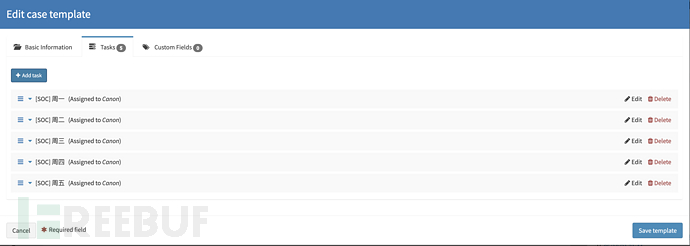
应急响应模板
可以参照应急响应阶段来创建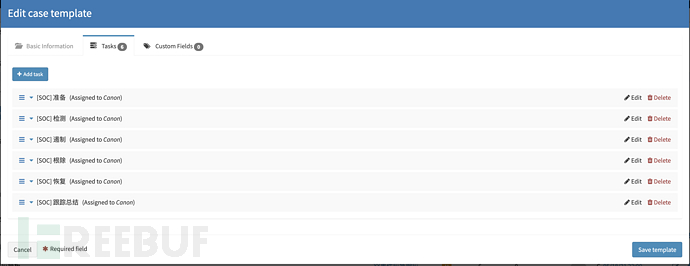
引用模板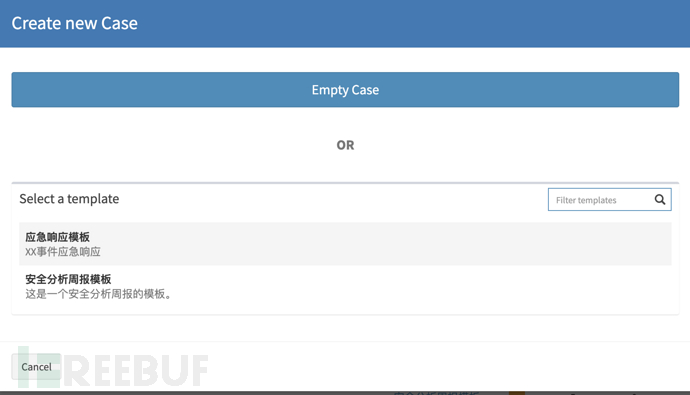
事件运营
SIEM(Alarm) -> TheHive(Alert)
TheHive与SIEM做了对接,主要将两种类型的告警自动化的推送到了TheHive上。
第一种:需要人工研判的安全事件。例如:基于内->外的NetFlow告警事件(异常端口访问,周期性请求等等)、敏感信息泄漏告警事件(黑客论坛监控、GitHub监控)。通常这类事件需要进行二次确认的,所以会选择通过TheHive来记录整个事件的处理过程。

第二种:需要重点关注的安全事件。例如:EDR上的告警事件,命中C2指标的情报告警,通常这类事件需要第一时间去响应。
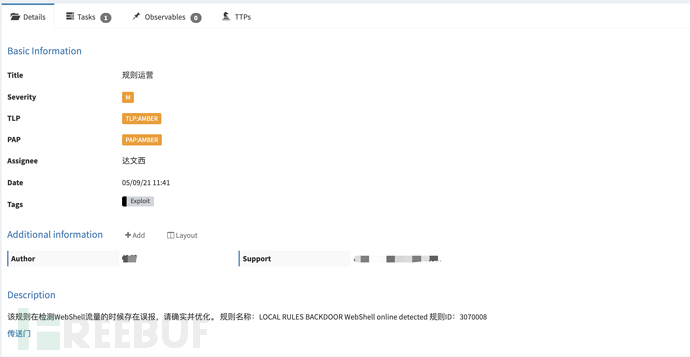
规则运营
SIEM(Alarm、Alert)-> TheHive(Case)
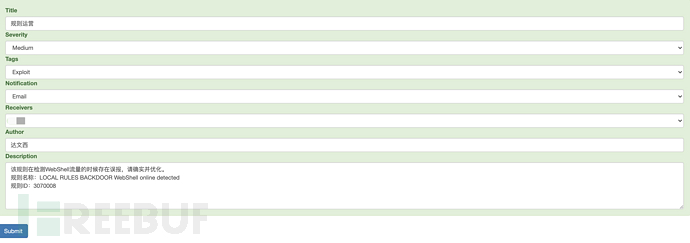
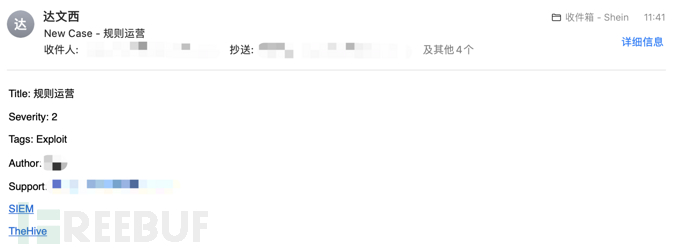
主要是将分析时发现的规则误报以及漏报的情况,通过手动提交Case的形式发送到TheHive上。例如,在SIEM上发现了某个告警存在误报的现象,通过SIEM提交该告警信息给指定负责人,系统会自动将邮件以及Case转到该人员名下。
通过SIEM推送至TheHive,并通知分析人员进行规则优化。
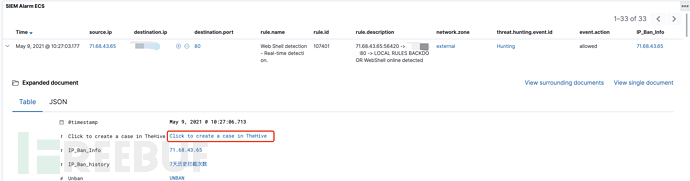
提交Case并邮件通知
TheHive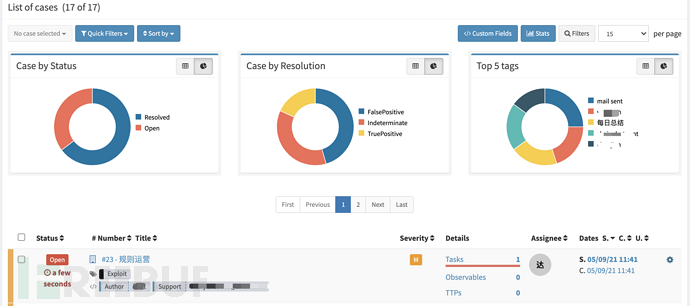
日常事项
安全分析周报
以周为单位创建Case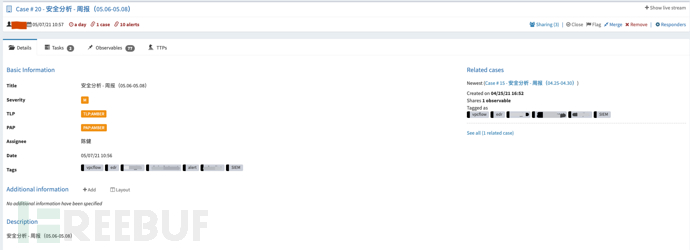
以天为单位创建Task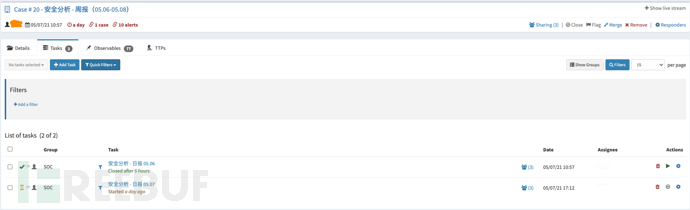
告警与Case相关联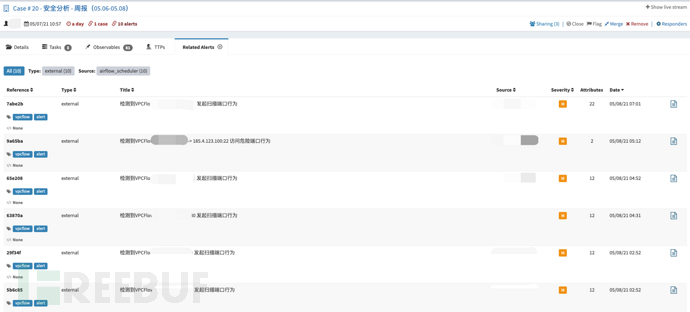
批量分析IoC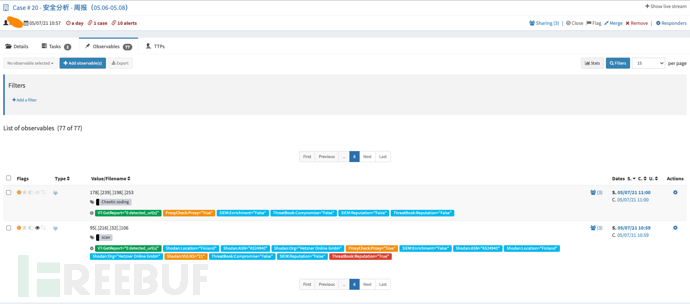
分享给需要关注的小组
写在最后
如果你有关注过开源解决方案的话,相信你一定有看到过一些TheHive与工作流(Shuffle、n8n)组件整合的方案。不难看出,TheHive擅长的是事件响应与分析,这是一种半自动化的形式。通过与工作流组件的对接,你会发现这就是一个“散装”版的SOAR。商业的SOAR相比开源的SOAR多了一个“作战室”的概念,这个功能与TheHive就会有那么一些相似。例如:你可以在作战室中分析某个IP的情报信息,或者联动现有安全设备对某个IoC进行响应的操作。这些功能其实就是对应到了TheHive中的Analyzers与Responders的功能。
我个人觉得TheHive这种“半自动化”的形式,可以很好的与SOAR进行互补,相信与SOAR对接后会有更多的“价值”被体现出来。例如:在分析任务中可按照场景的不同有选择的调用SOAR的PalyBook,并将响应结果feedback至TheHive中。其实TheHive上还有挺多东西值得说的,一次也写不完。更多东西还需要我们根据实际场景再去挖掘,“思路”很重要!
以上都是我个人的一些理解,欢迎指正。不喜勿喷,也欢迎各位大佬一起多多交流。
本文作者:, 属于FreeBuf原创奖励计划,未经许可禁止转载